Hey readers! I am testing a new way to share crafty DIYs. Let me know what you think:
DIY Cork Board
Tuesday, March 26, 2013
Monday, March 25, 2013
Hey, I think I could make that!
I sort of randomly decided I would start making my own clothes. I was getting new tires and wasting some time at JoAnne's fabric - wait - excuse me, I never WASTE time at JoAnne's, it is always time well-spent. Okay, I was spending some quality time with my friend JoAnne and saw this gorgeous blue 100% cotton apparel fabric.


I found myself picturing the fabric as a dress and I just dove in. Before I knew it, I was at the cutting counter getting a couple yards and browsing the patterns. I used a basic a-line pattern and tweeked a few things (like the width of the shoulders and length from the natural waist - I think my changes made it a bit more young-looking). Here is the finished product with a belt:
And here it is without the belt - I know it looks huge on the hanger, but it looks pretty adorable even without the belt.
If you like what you see, I am selling the dress online in a variety of sizes on my etsy store.
Wednesday, March 13, 2013
Wedding Wednesday: Brooch Bouquets
A few years ago, I saw pictures of Miranda Lambert's wedding and became intrigued by the idea of making a brooch bouquet.


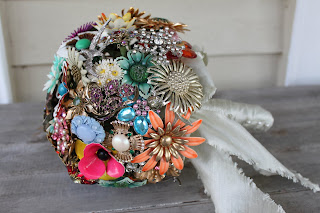


Isn't it adorable? After seeing more and more pictures, I fell in love with the idea and knew I wanted to use one for my own wedding. There are plenty for sale online, but I had several family jewelry pieces that I wanted to use. Every single piece incorporated was a family heirloom. Sigh. Love!
I wanted to make sure all the brooches stayed in good condition and that I could take the bouquet apart safely if necessary, so I rigged the brooches up on long pieces of wire, wove them through a white doily stiffened with fabric softener and a balloon, and then gathered the wire to create the base. I covered the base with lace ribbon and a hankie. You can kind of see the doily in the photo above behind the brooches. I forgot to take pictures while I was making it :-/
Brooch bouquet round-up!
Here are some other photos to inspire you if you are thinking a brooch bouquet might be in your future:

Monday, March 11, 2013
DIY: Living Room Window Treatment
Since moving into our loft in October, I have been dying to install a unique window treatment in the living room. Originally I hoped to hang curtains from the top of the window (which is something like 20 feet). I discovered very quickly that curtains for large windows are expensive.
So I waited and waited for great sales to pop up, I researched curtain prices, and kept an eye out for a good deal. It didn't really come along until one day I decided it had been too long since I last used my sewing machine. I took my JoAnne's coupons, decided to bite the bullet and buy some fabric.
I thought yellow would be a really nice accent color for our living room. I think I've mentioned before that we have a modern/Americana theme going. There is a check blue couch centered between our windows. Yellow is bright and it's different - exactly what I wanted.
Here is the fabric I found (6 yards total, 3 per panel, approx $40):

.JPG)
.JPG)
So I waited and waited for great sales to pop up, I researched curtain prices, and kept an eye out for a good deal. It didn't really come along until one day I decided it had been too long since I last used my sewing machine. I took my JoAnne's coupons, decided to bite the bullet and buy some fabric.
I thought yellow would be a really nice accent color for our living room. I think I've mentioned before that we have a modern/Americana theme going. There is a check blue couch centered between our windows. Yellow is bright and it's different - exactly what I wanted.
Here is the fabric I found (6 yards total, 3 per panel, approx $40):
Isn't it cool? It's got three different blues in it, turquoise/navy/and almost a cornflower blue, plus peacocks and hummingbirds, and yellow! I bought 2 yards of navy for stripes and 4 yards for the main portion of the panels (for a total of two curtain panels).
Now I don't have a sewing cut board thingy, so I laid the fabric out in our bedroom, decided where I wanted the stripes to be and just cut with a 90 degree ruler. It took a lot longer than it probably would if I had better supplies.
After cutting the fabric, I sewed the pieces together, hemmed the sides, and sewed a larger hem at the top to put through the curtain rod. Here is the result:
I was happy with them. But mad that after all that work and buying 40 bucks worth of fabric, two panels only covered the ends of my windows. Don't get me wrong, making curtains is pretty easy and fulfilling, and yes, they are pretty, but I also wanted curtains for a functional purpose - privacy. So I went back to looking around for better options.
I decided to buy roman shades or wooden blinds to replace the aluminum and give it a more cohesive look. But while I was shopping, I ran across some pretty white sheers for $5 each at Walmart. I ended up buying 4 of those instead, an extra set of curtain rods (for the sheers) and put those up.
Here is the final look! I am very pleased with the result.
Thursday, March 7, 2013
Thrifty Thursday: Organization Round-up
A few weeks ago I asked readers what they would like to see on the blog and most wanted to see organization solutions for storing crafts and everyday supplies. This is a dilemma I have been working on too, so I will likely be posting on the topic again soon.
My first task was to find a way to store all my wrapping paper, gift bags, ribbons, and craft materials. The craft materials alone were taking up TONS of space. So here are my solutions:
Use a garment bag to store wrapping supplies!
.JPG)
.JPG)
Put nails on the sides of your closets to store hanging wreaths or seasonal decorations. I also installed an old box onto the wall to hold my glue gun, tape, and wood glue.
.JPG)
Use decorative tags to label bins. I made a basket for easy craft access - in it, I store the most used craft supplies for the season.
.JPG)
Another shot of my wreath storage.
.JPG)
Here are some ideas from other bloggers:
I heart organizing - I love this full door use for wrapping storage. Unfortunately, I don't have the space, but this could certainly be used for other supplies!

Inkspot Workshop - this is so cute. Perfect for those of you who don't have a lot of space to store craft supplies or are mobile.

Better Homes and Gardens: this is on my to-do list. I love this! So simple. Tin cans, covered in fabric, used to store office supplies. Genius.

Pin your home - I love this one! I hate using an entire drawer for all this crap.

Be different act normal - another one I love and have yet to try, but I think it would be helpful!

Brilliant. If you live where it's cold or chilly often, you may have 20 scarves shoved in the corner in the closet or hung around in all sorts of places. This is so smart for keeping them in one place and out of the way.

Yesterday on Tuesday
I want to use this for grocery bags! Not doggy bags. But I see the appeal both ways.
I think this is a paper towel holder - awesome!


Wednesday, March 6, 2013
Wedding Wednesday: Program template
Hey readers! Another template for you! For our programs, I sewed them together with a scrapbook page for a cover. I used lace and burlap to embellish the cover, too. All the photos were taken by Kaitlin Colston Photography (gorgeous!)
Click here to view the template in google plus - be sure to download it to see it in its TRUE form with the right fonts/styles.


Click here to view the template in google plus - be sure to download it to see it in its TRUE form with the right fonts/styles.
Monday, March 4, 2013
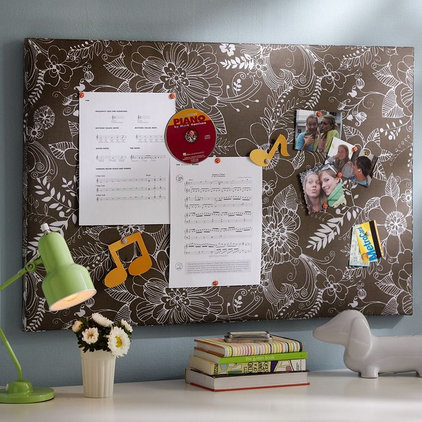
DIY: Fabric covered cork board
A few weeks ago I ran across a great blog called Anne the Adventurer. I absolutely recommend reading her stuff - she does awesome projects and is just adorable. The project I ran across was her DIY Chevron Bulletin Board. I had to try it.
My office area is at the front of our loft and I couldn't stand the ugly grey box that was right above my desk. I also couldn't stand how messy it was.
.JPG)
Before I jump into the step-by-step, I did a couple things different from Anne the Adventurer. First, I used foam board instead of plywood. Since the grey box is that thingy that you need to access in case you blow a fuse (yeah, I'm good with mechanics), I knew I needed to create something lightweight that I could take down and put back up if needed. The second thing I did differently was use hot glue instead of the wood glue. It dried instantly and I literally finished the project in a half hour. Third, I used rolled cork instead of old cork boards. Finally, I used velcro adhesives to mount the board to the wall, again so that I could pull it down and put it up easily.
We have an Americana-type feel to the front of our loft so I chose a red starred, light brown, and navy fabric. Here are the steps I followed.
1. Iron the fabric
2. Attach the rolled cork to the foam board using hot glue.
3. Line up the fabric where you want it to be on the board - mine had lines on it and I didn't want them to be crooked.
.JPG)
4. Drape the fabric on a clean surface (I used a stool since we have a doggie and no matter how much we vacuum her hair is EVERYWHERE). Place the foam board on top of the fabric and hot glue in place, pulling the sides tightly over the cork board.
.JPG)
5. Mount on the wall - like I said I used velcro adhesives.
.JPG)
Round-up! Here are some other bloggers who have made these types of boards:


My office area is at the front of our loft and I couldn't stand the ugly grey box that was right above my desk. I also couldn't stand how messy it was.
Before I jump into the step-by-step, I did a couple things different from Anne the Adventurer. First, I used foam board instead of plywood. Since the grey box is that thingy that you need to access in case you blow a fuse (yeah, I'm good with mechanics), I knew I needed to create something lightweight that I could take down and put back up if needed. The second thing I did differently was use hot glue instead of the wood glue. It dried instantly and I literally finished the project in a half hour. Third, I used rolled cork instead of old cork boards. Finally, I used velcro adhesives to mount the board to the wall, again so that I could pull it down and put it up easily.
We have an Americana-type feel to the front of our loft so I chose a red starred, light brown, and navy fabric. Here are the steps I followed.
1. Iron the fabric
2. Attach the rolled cork to the foam board using hot glue.
3. Line up the fabric where you want it to be on the board - mine had lines on it and I didn't want them to be crooked.
4. Drape the fabric on a clean surface (I used a stool since we have a doggie and no matter how much we vacuum her hair is EVERYWHERE). Place the foam board on top of the fabric and hot glue in place, pulling the sides tightly over the cork board.
5. Mount on the wall - like I said I used velcro adhesives.
Round-up! Here are some other bloggers who have made these types of boards:


Friday, March 1, 2013
Kansas Gal's Mom!
I'm switching up the order of this week's posts. Instead of follower Friday's, my mom joins us today as a guest writer! :-) Here's a picture of me and my mom:

From my mom:
.JPG)
.JPG)
.JPG)
.JPG)
.JPG)
"Ever since I can remember I have always loved to work on
crafty stuff. When I was young, I would constantly
coerce my dad into building something I saw on television or to help me
recreate an idea from a picture in a beloved book. He could literally make anything from pieces
of wood and a few tools! And when my
daughters were little girls, we always had something we were trying to build.
Whether it was a Barbie wonderland on the front porch or a float in our
driveway for a parade, the fun part was in the doing. So, even though my dad has been gone for some
time and both girls are grown, I still enjoy the “doing” of a good project.
I found this desk at First Saturday in the West
Bottoms.
It was $80.00 and although that
seems like a lot for an old desk, it was exactly what I was looking for to use
as a buffet in the dining room. Plus the
owner said she would deliver the desk to my front porch. That sealed the deal! I sanded the desk, painted it with paint I
already had, and bought pink knobs for the drawers from Hobby Lobby.
By the way, Hobby Lobby has a wide variety of
knobs always on sale for half price.
My second project last week was a little chest of drawers
that I bought at an auction for 22.50.
I
used a can of turquoise spray paint and 4 mismatched knobs for the drawers
(again from Hobby Lobby).
Basically for
my efforts, I gained two awesome up-cycled pieces of furniture and had several
hours of fun!"
Thanks, mom! These projects are SO cute! Now you see where I get it :-)
Thanks, mom! These projects are SO cute! Now you see where I get it :-)
Subscribe to:
Posts (Atom)