Thursday, May 2, 2013

Sewing Lesson #1

Lesson #1: Be sure to leave enough fabric beyond your stitch

Here's a fun story that demonstrates the importance of the above-mentioned lesson. Recently, my husband and I took a trip to visit his family in Orange County that happened to fall on Easter weekend. I had just completed my super cute blue dress and was so excited to be going somewhere warm to wear it.

Easter Sunday rolls around and I have two blue dresses that I packed for the occasion. One of the blue dresses I brought was the one I recently had sewn (below). I always pack a  few options so that I can have some wardrobe choices while I travel. I went back and forth about which one to wear all morning. I felt like I would be showing off a little if I wore the one I made, but then again, I was proud of it and was excited to wear it, so I ended up settling on the idea that it wasn't showing off, but wearing something that I had made with my two hands - and that's cool!


And cute, right?!

So we get to Easter church service and it's just a wonderful morning. Seeing Kyle's family and church friends is always a warm experience. Worship was beautiful, music led by Uncle Gary, and the whole family was there. Awesome!

And then some lady sitting behind me taps on my shoulder...she says, "you may not want to stand up again." I have this blank look on my face. She explains, "There's a hole in the back of your dress." I reach back, and sure enough, I feel a massive hole right over my butt crack. True story. Seriously, right. over. my. BUTT CRACK. The terrifying realization that I had been exposing my bottom in the sanctuary rushed over me. I was horrified. I took my husband's suit coat and wore it out of the building, walking (running) out as fast as I could.

So, sewing lesson number 1: leave enough fabric beyond the stitch so you don't flash all the nice people at church.


Tuesday, March 26, 2013

Monday, March 25, 2013

Hey, I think I could make that!

I sort of randomly decided I would start making my own clothes. I was getting new tires and wasting some time at JoAnne's fabric - wait - excuse me, I never WASTE time at JoAnne's, it is always time well-spent. Okay, I was spending some quality time with my friend JoAnne and saw this gorgeous blue 100% cotton apparel fabric.


I found myself picturing the fabric as a dress and I just dove in. Before I knew it, I was at the cutting counter getting a couple yards and browsing the patterns. I used a basic a-line pattern and tweeked a few things (like the width of the shoulders and length from the natural waist - I think my changes made it a bit more young-looking). Here is the finished product with a belt:


And here it is without the belt - I know it looks huge on the hanger, but it looks pretty adorable even without the belt.


If you like what you see, I am selling the dress online in a variety of sizes on my etsy store.

Wednesday, March 13, 2013

Wedding Wednesday: Brooch Bouquets

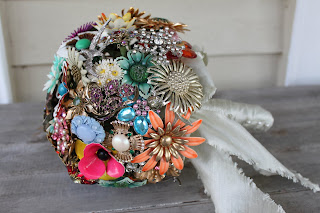
A few years ago, I saw pictures of Miranda Lambert's wedding and became intrigued by the idea of making a brooch bouquet.


Isn't it adorable? After seeing more and more pictures, I fell in love with the idea and knew I wanted to use one for my own wedding. There are plenty for sale online, but I had several family jewelry pieces that I wanted to use. Every single piece incorporated was a family heirloom. Sigh. Love!


I wanted to make sure all the brooches stayed in good condition and that I could take the bouquet apart safely if necessary, so I rigged the brooches up on long pieces of wire, wove them through a white doily stiffened with fabric softener and a balloon, and then gathered the wire to create the base. I covered the base with lace ribbon and a hankie. You can kind of see the doily in the photo above behind the brooches. I forgot to take pictures while I was making it :-/ 


Brooch bouquet round-up! 

Here are some other photos to inspire you if you are thinking a brooch bouquet might be in your future:


Monday, March 11, 2013

DIY: Living Room Window Treatment

Since moving into our loft in October, I have been dying to install a unique window treatment in the living room. Originally I hoped to hang curtains from the top of the window (which is something like 20 feet). I discovered very quickly that curtains for large windows are expensive.

So I waited and waited for great sales to pop up, I researched curtain prices, and kept an eye out for a good deal. It didn't really come along until one day I decided it had been too long since I last used my sewing machine. I took my JoAnne's coupons, decided to bite the bullet and buy some fabric.

I thought yellow would be a really nice accent color for our living room. I think I've mentioned before that we have a modern/Americana theme going. There is a check blue couch centered between our windows. Yellow is bright and it's different - exactly what I wanted.

Here is the fabric I found (6 yards total, 3 per panel, approx $40):


Isn't it cool? It's got three different blues in it, turquoise/navy/and almost a cornflower blue, plus peacocks and hummingbirds, and yellow! I bought 2 yards of navy for stripes and 4 yards for the main portion of the panels (for a total of two curtain panels).

Now I don't have a sewing cut board thingy, so I laid the fabric out in our bedroom, decided where I wanted the stripes to be and just cut with a 90 degree ruler. It took a lot longer than it probably would if I had better supplies. 

After cutting the fabric, I sewed the pieces together, hemmed the sides, and sewed a larger hem at the top to put through the curtain rod. Here is the result:


I was happy with them. But mad that after all that work and buying 40 bucks worth of fabric, two panels only covered the ends of my windows. Don't get me wrong, making curtains is pretty easy and fulfilling, and yes, they are pretty, but I also wanted curtains for a functional purpose - privacy. So I went back to looking around for better options.

I decided to buy roman shades or wooden blinds to replace the aluminum and give it a more cohesive look. But while I was shopping, I ran across some pretty white sheers for $5 each at Walmart. I ended up buying 4 of those instead, an extra set of curtain rods (for the sheers) and put those up. 

Here is the final look! I am very pleased with the result.


Thursday, March 7, 2013

Thrifty Thursday: Organization Round-up

A few weeks ago I asked readers what they would like to see on the blog and most wanted to see organization solutions for storing crafts and everyday supplies. This is a dilemma I have been working on too, so I will likely be posting on the topic again soon. 

My first task was to find a way to store all my wrapping paper, gift bags, ribbons, and craft materials. The craft materials alone were taking up TONS of space. So here are my solutions: 

Use a garment bag to store wrapping supplies!


 I hung the gift bags from the hanger and the wrapping paper throughout the bag.

Put nails on the sides of your closets to store hanging wreaths or seasonal decorations. I also installed an old box onto the wall to hold my glue gun, tape, and wood glue.

Use decorative tags to label bins. I made a basket for easy craft access - in it, I store the most used craft supplies for the season.

Another shot of my wreath storage.

Here are some ideas from other bloggers:

I heart organizing - I love this full door use for wrapping storage. Unfortunately, I don't have the space, but this could certainly be used for other supplies!

Inkspot Workshop - this is so cute. Perfect for those of you who don't have a lot of space to store craft supplies or are mobile.
creative craft storage vintage suitcase

Better Homes and Gardens: this is on my to-do list. I love this! So simple. Tin cans, covered in fabric, used to store office supplies. Genius.
Paint Cans Turned Organizer

Pin your home - I love this one! I hate using an entire drawer for all this crap.

Be different act normal - another one I love and have yet to try, but I think it would be helpful!

Brilliant. If you live where it's cold or chilly often, you may have 20 scarves shoved in the corner in the closet or hung around in all sorts of places. This is so smart for keeping them in one place and out of the way.

Yesterday on Tuesday
Dish Soap ReVamp - YoT #dishsoap #organizing #freeorganizing #frugalorganizing #yesterdayontuesday

I want to use this for grocery bags! Not doggy bags. But I see the appeal both ways.
DishDoggy Bag Dispenser - YoT #doggybags #petorganization #organizing #freeorganizing #frugalorganizing #yesterdayontuesday

I think this is a paper towel holder - awesome!
Bracelet Organization - YoT #jewelryorganization #braceletorganization #bathroomorganization #yesterdayontuesday


Wednesday, March 6, 2013

Wedding Wednesday: Program template

Hey readers! Another template for you! For our programs, I sewed them together with a scrapbook page for a cover. I used lace and burlap to embellish the cover, too. All the photos were taken by Kaitlin Colston Photography (gorgeous!)

Click here to view the template in google plus - be sure to download it to see it in its TRUE form with the right fonts/styles.